Be sure to review the current Crash Magic requirements: https://www.pdmagic.com/kb/CurrentCrashMagicRequirements
Installation of Crash Magic begins by downloading the Crash Magic Installer program from www.GovernmentTools.com. (locate the "Installers" link) Run this setup program on the server. A new shortcut entitled "Crash Magic Installer" will be added to the system menu and to the desktop.
Note: The current installer handles all of the IIS configuration details. However, if you prefer to take the steps yourself or would like to see what configuration steps will be executed, view the manual steps and the sample install log.
Install the Crash Magic files
Start the process by launching the Crash Magic Installer from the start menu. Important, this utility must be run "as administrator".
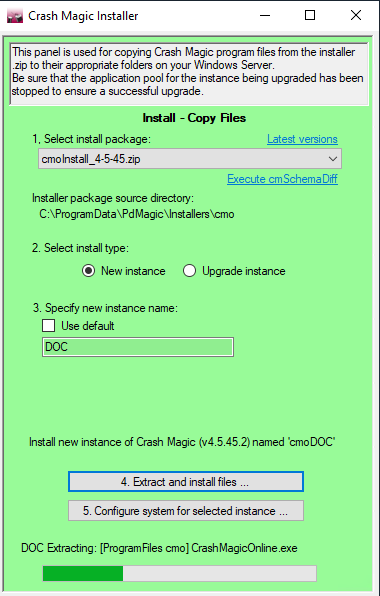
1.The first step will be to download the desired version of the Crash Magic program. This is done with the "Latest versions" link. Choose the desired package and download it. That package will be automatically selected in the list.
2.In step 2, choose "New instance" unless you are upgrading an existing instance of the program.
3.Next, choose an instance name. While "use default" is an option, we've found it to be cleaner to always specify an instance name. Some good options are "prod" or "dev" or "test". "cm" will also work. For this documentation, we are using the name "DOC". This will be the prefix or suffix for the the names of the app pool, user accounts, folders and the end of the URL path used to access the system.
4.Next, select "Extract and install files...". You will be prompted to confirm before the copy starts. The process will validate the install package and then copy files from it into your Windows System; Program Files (x86)/PdMagic; and Program Data folders.This can take several minutes.
5.Once the file copy is complete, select the "Configure system for selected instance ..." button to open the configuration dialog.
Configuring Windows and IIS for this instance
Pre-load settings tab
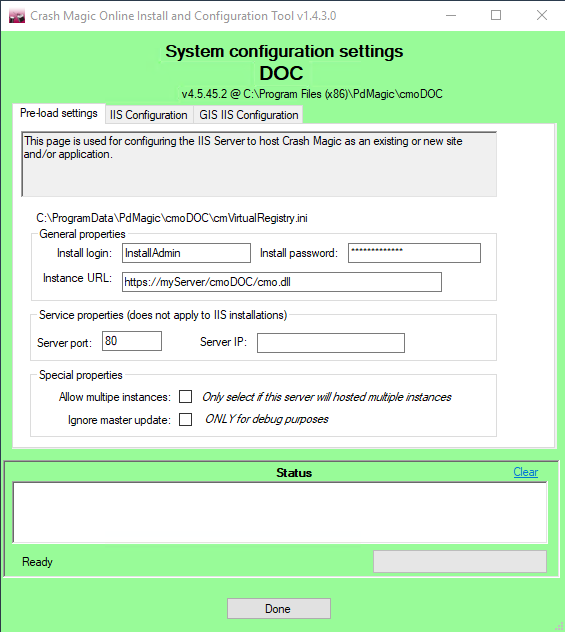
1.Create a login and password for the "Install login". This will be needed to access the program "maintenance" when the application is not yet fully configured. Enter the "Instance URL". This value is provided to the browser to access some aspects of the program. It is important that the URL be the value that a user will see when running the program. It may or may not be the machine name. This value can be updated after the program installation is complete if the URL is not yet known
2.For an IIS installation, skip the server port and server IP options, as IIS will handle these.
3.If this server will host multiple instances of Crash Magic, then all instances must have the "Allow multiple instances" checkbox checked. Do not check this box unless you are certain there will be multiple instances. It removes some protective error handling from the launch process.
IIS Configuration tab
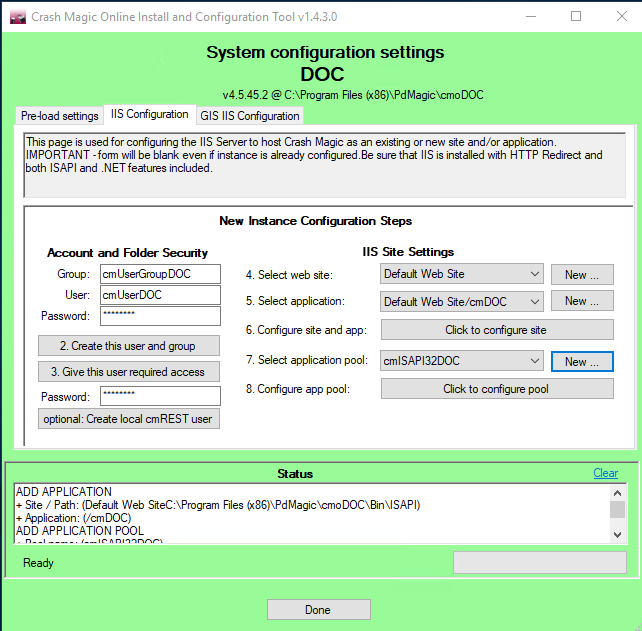
1.It is recommended that you accept the default Group and User account names. These accounts will be created as local Windows accounts. They will be used by the IIS application to access the local file system. (ProgramData/PdMagic/cmoDOC and Program Files/PdMagic/cmoDOC/bin/ISAPI) Select an appropriate password.
2.Click "Create this user and group". Any errors will appear in red in the Status log at the bottom.
3.Click "Give this user required access". This is the step that will iterate all the files that the program will need to access. It will take a minute or so to complete.
The optional "Create local cmREST user" creates a local account called cmREST. This account can be used when the system is configured for Active Directory logins. Rather than having to use an existing AD account, the local cmREST account credentials can be used to get past IIS AD security. To enable this account, enter a password and click "optional: Create local cmREST user". This process can also be completed manually at a future date if needed.
4.In most cases, especially on dedicated servers / VMs, it is best to use the "Default Web Site" created by IIS. Other web sites can be created if the server is multi-homed or is configured for such.
5.A new application should always be created when installing a new instance. Click the "New ..." button and accept the default name.
6.Click the "Click to configure site" button and verify that there were no errors in the status list. This option sets all of the necessary options for the selected website and application.
7.A new application pool should always be created for a new Crash Magic instance. Click the "New ..." button and select the default application name. That application pool will be configured to use the cmUser account from step 1.
8.Click the "Click to configure pool" button and verify that no errors appear in the status box.
GIS IIS Configuration tab
In most cases, Crash Magic will be configured to interact with an ESRI or other GIS server. Even if not, it is wise to set up the required Crash Magic GIS services in IIS. Choose the GIS IIS Configuration tab.
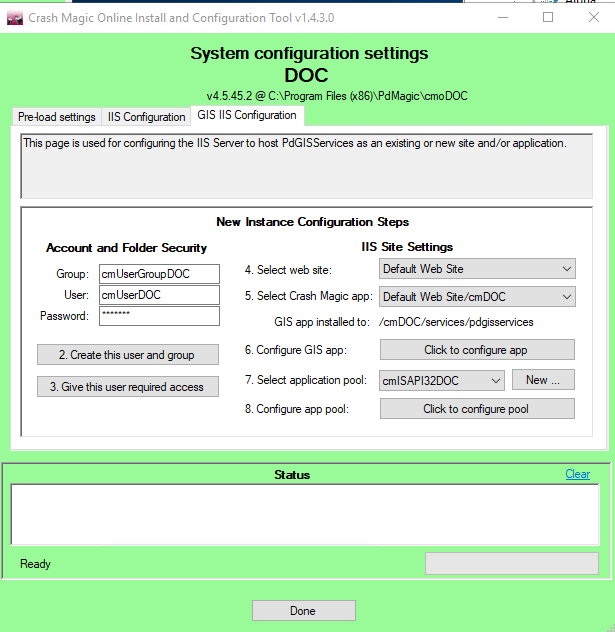
1.Leave the Group and User the same as the IIS Configuration tab. Enter the same password from the IIS Configuratiab as well.
2.Skip the step of creating the user and group as it was just created in the prior section.
3.Click the "Give this user required access" button.
4.Select the same website as used in the IIS Configuration tab. Note: if either this or the next option is not available, select "Done" and then "Configure system for selected instance..." again to re-open the dialog. They should now be available.
5.Select the same Crash Magic app as used in the IIS Configuration tab.
6.Select "Click to configure app"
7.Choose "New..." to create a new application pool for the Pd GIS Services.
At this point, if you selected all the defaults, the program should be ready to run.
Other considerations
•If you made selections that resulted in one or more new web sites, you'll need to use the IIS Manager to adjust the bindings so that traffic is routed properly.
•If you are setting the system up for https, use the IIS Manager to install the appropriate certificate and bindings for port 443.
•If you are setting the system up for Active Directory authentication, that will require setting the "Authentication" option for the application to disable Anonymous Authentication and enable Windows Authentication. We've also found that it helps to verify that the only Provider for the Windows Authentication is "NTLM". Remove any others for this application. (This seems to important for the MS Edge browser)
•If any errors occurred during the installer run (they'll be shown in red in the status window) be sure to figure them out before attempting to run the program.