Now that we have generated a number of reports, it is time to take a look at limiting data. Crash Magic contains a powerful filtering tool that can limit data based on any fields in your database. These filters can be very simple (show only accidents with snow) to more complex (show only accidents with snow on Tuesdays from 10-11pm). Filters do not delete records from the database. They only limit the number of collisions displayed.
There are a few basic concepts that you need to understand about filters before we can begin:
Filters will only reduce the number of records
It is important to note that filters only remove data from the study. A study is still limited by the date range and location on the settings tab, a filter is simply limiting that data.
Filters apply to all reports in a study
Filters are accessible for all reports and studies using the ![]() button. Changing the filter will change the data not only in the report that you clicked the filter button on, but all reports that fall under the study in use.
button. Changing the filter will change the data not only in the report that you clicked the filter button on, but all reports that fall under the study in use.
Time to write your first filter! To start click the ![]() button at the bottom of any report. This will bring up the Filter selector.
button at the bottom of any report. This will bring up the Filter selector.
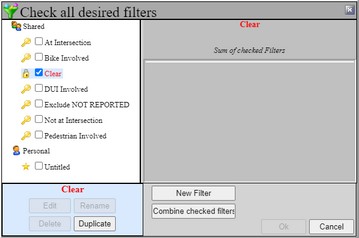
The filter template selector allows users to store and reuse filters.
Click the New button to create a new filter. This will add an 'Untitled' filter to the listing. Click the new 'Untitled' to activate it, then click the Edit button.
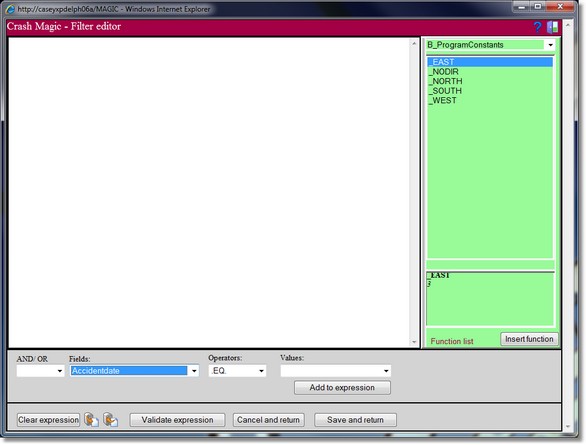
The edit filter window has three colored sections. The white area is where your actual filter will be displayed. The green section is for selecting advanced filter functions. The gray section contains the items used most frequently edit filters.
In this example we will write a simple filter. Filter fields and values are specific to the database Crash Magic is connected to. Your fields and values may be different. In this example we will write a filter for collisions that occurred when it was dark.
1.Click on the "Fields" drop down menu to view a list of fields from your database
2.Select the field in your database that contains the lighting condition (This could be light, lightcondition or other name for lighting condition in your database)
3.Leave the Operators field at ".EQ."
4.Click on the "Values" drop down menu
5.Select the value for a dark lighting condition(This could be dark, dark - lighted, or other value for a dark lighting condition)
6.Click the "Add to expression" button to insert the filter in the editor above
7.Click the "Save and return" button to see the results of the filter
The report or study being displayed will show fewer collisions with the filter applied.
In this example for a collision to be included in the study the field LIGHTCONDITION from the client collision database must have a value of LightingconditionDark ~ Lighted for the collision record to be included.
To remove a filter click on the filter button ![]() to return to the filter selection. Click on the "Clear" filter. Then click the OK button to save the information.
to return to the filter selection. Click on the "Clear" filter. Then click the OK button to save the information.
Filter conditions resolve to true or false. The filter is applied to each collision record in the study. If the result of applying the filter to the collision record is equal to true the record is included in the study. If the result is false, the record is not included in the study. Multiple conditions can be joined together using the "AND/OR" drop down menu.