The steps that follow are now all handled by the cmIISConfig utility. This documentation is here to provide information to system administrators about the steps that are taken in the cmIISConfig process.
To configure Crash Magic Online to run inside of IIS 7 as an ISAPI plugin, the following steps must be taken. These steps assume that your server and network are correctly configured.
INSTALL IIS and components If not already installed
1.Install IIS while logged in as administrator to the server
2.Click Start/All Programs/Administrative Tools/Server Manager
3.Click the Roles
4.With the Roles summary page open click Add Roles
5.On the Select Server Roles window check the box next to Web Server (IIS)
6.Click the Next button
7.On the Role Services window check the box next to "CGI" under Web Server/Application Development
8.Check the box next to "ISAPI Extensions" under Web Server/Application Development
9.Check the box next to "Dynamic Content Compression" under Web Server/Performance
10.Check the box next to IIS "Management Scripts and Tools" under Management Tools
11.Click the Next button
12.Click the closed button when complete
Additional Windows updates should be installed at this time if required
Create cmUser to run the Crash Magic application in IIS
1.Open the the server manager(You may wish to move the Post install utility window to the bottom of the screen)
2.Open Configuration/Local Users and Groups/Users
3.Right click in the Users window and select "New User..."
4.Enter a user name of cmUser for the user name
5.Full name Crash Magic user
6.Description of Crash Magic IIS user
7.Enter a password and confirm the password(This password will be needed for future steps)
8.Uncheck the "User must change password at next logon"
9.Check User cannot change password
10.Check Password never expires
11.Click the create button
12.Click the close button
Create the cmUsers group for Crash Magic
1.Create a user group for Crash Magic:
2.Ensure the Computer Management window is still open from the previous step
3.Right click on the Groups folder under Local User and Groups
4.Select New Group...
5.Enter a Group name of cmUsers
6.Enter a description of Crash Magic Online users
7.Click the Add button
8.Click the Locations... button
9.Select the local machine
10.Click OK
11.Enter cmUser in the object names to select field
12.Click the OK button to return
13.Click the Create button to create the group
14.Click the Close button
Make cmUser a member of the IIS_IUSRS group
1.Right click on the cmUser that was just created
2.Select properties
3.Click on the Member of tab
4.Click the Add button
5.Select the local computer name form the Locations
6.Enter IIS_IUSRS in the object names to select box
7.Click the check names button to add the machine qualification(Machine Name>\cmUser)
8.Click the OK button
* DB2 database users will need to make cmUser a member of the DB2USERS group for Crash Magic to access the DB2 database drivers.
Grant permissions to the Crash Magic Sys data folders
1.Return to the Crash Magic post-install utility(If it has been closed select Start/All Programs/Pd Magic/Crash Magic post-install utility. You may wish to leave this utility open for the remainder of the install process.)
2.In the folder section select the Crash Magic Program Data
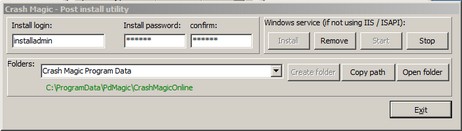
3.Click the Open folder button
4.With the Crash Magic program data folder open right click on the Sys folder shown and select Properties
5.Click on the Security tab
6.Click the Edit button
7.Click the Add button
8.Select the local machine for the location
9.Enter cmUsers in the object names to select box
10.Click the check names button to add the machine qualification
11.Click the OK button to return to the Permissions for window
12.With the cmUsers selected ensure that List folder contents, Read and Write are checked
13.Click the OK button and close the Permissions for window
14.Click the OK button to close the Properties window
Grant cmUsers permissions to the Crash Magic ISAPI folder
1.With the Crash Magic post-install utility application open
2.In the folder section select the Crash Magic Bin folder
3.Click the Open folder button
4.With the Crash Magic Bin folder open right click on the ISAPI folder and select Properties
5.Click on the Security tab
6.Click the Edit button
7.Click the Add button
8.Select the local machine for the location
9.Enter cmUsers in the object names to select box
10.Click the check names button to add the machine qualification
11.Click the OK button to return to the Permissions for window
12.With the cmUsers selected ensure that Read & execute, List folder contents and Read are checked
13.Click the OK button and close the Permissions for window
14.Click the OK button to close the Properties window
Create a new cmISAPI32 Application pool
1.Open the IIS manager
2.Expand the machine in the connections tree, and click on the Application pools in IIS
3.Click the Add Application Pool...
4.Enter a name of cmISAPI32
5.Use the default setting for .NET Framework version
6.Use the default setting for Managed pipeline mode of Integrated
7.Ensure the check box of Start application pool immediately is checked
8.Click OK to create the pool
9.Right click on the cmISAPI32 application pool for Crash Magic and select advanced settings.
10.64 bit operating systems will need to set Enable 32-Bit Applications to True in the (General section)
11.Set the identity field to cmUser created from the previous steps
12.Set Idle time out to 360 min
13.Click OK to close the Advanced Settings window
In IIS add the Crash Magic application to the Default web site
1.Expand the Sites section in the connections tree.
2.Right click on the Default Web Site and select Add Application
3.Enter an Alias for the application(cm is the recommended alias)
4.Select the application pool for Crash Magic(cmISAPI32)
5.With the Add Application window still open return to the Crash Magic post-install utility application
6.Select Crash Magic ISAPI in the Folders drop down menu
7.Click the Copy path button
8.Return to the Add Application window
9.Paste the path into the Physical path box
10.Click the Connect as button
11.Click the Specific user radio button
12.Click the Set button
13.Enter the cmUser in the user name field
14.Enter the password for cmUser in the Password field.
15.Enter the password for cmUser in the Confirm Password field
16.Click the OK button
17.Click the OK button
18.Click the Test Settings button to confirm cmUser can access the ISAPI directory
19.Click OK to close the Add Application window
Edit the ISAPI dll handler mappings
1.While on the Home screen for the application(/cm Home) that was just created, Ensure that Features View is selected.
2.Open the Handler Mappings icon
3.Right click on the ISAPI-dll and select Edit
4.With the Edit Module Mapping still open return to the Crash Magic post-install utility application
5.Select Crash Magic ISAPI dll in the Folders drop down menu
6.Click the Copy path button
7.Return to the Edit Module Mapping window
8.Paste the path into the Executable box
9.Click the request Restrictions button
10.Ensure that Invoke handler only if request is mapped to File checkbox is checked under the Mapping tab.
11.Under the verb tab ensure that All verbs radio button is selected
12.Under the Access tab ensure the Execute radio button is selected
13.Click OK to return the edit script map
14.Click OK to close the window
15.Click Yes to allow this ISAPI extension
Allow ISAPI executions
1.While still in Handler Mappings for the application Right click on ISAPI-dll and select Edit Feature Permissions...
2.Select edit feature permissions
3.Check the Execute check box
4.Click OK(This will also enable CGI-exe)
Add the CrashMagicOnline_ISAPI.dll as the default document
1.Click on the directory created for Crash Magic(cm) in the Connections section of the IIS manager to return to the IIS Home screen for the application(/cm Home)
2.Open the Default Document icon
3.Click Add under Actions
4.Enter CrashMagicOnline_ISAPI.dll in the Name field
5.Click the OK button to return
Add a virtual directory name CMFiles to the application
1.Right click on the directory created for Crash Magic(cm) under Connections section of IIS
2.Select add virtual directory
3.In the Alias text box enter CMFiles
4.With the Add Virtual Directory window still open return to the Crash Magic post-install utility application
5.Select Crash Magic SYS Files in the Folders drop down menu
6.Click the Copy path button
7.Return to the Add Virtual Directory window
8.Paste the path into the Physical path box
9.Click the Connect as button
10.Click the Specific user radio button
11.Click the Set button
12.Enter the cmUser in the user name field
13.Enter the password for cmUser in the Password field.
14.Enter the password for cmUser in the Confirm Password field
15.Click the Ok button
16.Click the OK button
17.Click the Test Settings button to confirm the CMUser can access the Files directory
18.Click the OK button to close the Add Virtual Directory window
Add another virtual directory named CMCache to the cm application
1.Right click on the directory created for Crash Magic(cm) under Connections section of IIS
2.Select add virtual directory
3.In the Alias text box add CMCache
4.With the Add Virtual Directory window still open return to the Crash Magic post-install utility application
5.Select Crash Magic Cache in the Folders drop down menu
6.Click the Copy path button
7.Return to the Add Virtual Directory window
8.Paste the path into the Physical path box
9.Click the Connect as button
10.Click the Specific user radio button
11.Click the Set button
12.Enter the cmUser in the user name field
13.Enter the password for cmUser in the Password field.
14.Enter the password for cmUser in the Confirm Password field
15.Click the Ok button
16.Click the OK button
17.Click the Test Settings button to confirm the CMUser can access the Files directory
18.Click the OK button to close the Add Virtual Directory window
Add MIME types(Depending on the web server some extensions may already be enabled)
1.Click on the directory created for Crash Magic(cm) in the Connections section of the IIS manager to return to the IIS Home screen for the application(/cm Home)
2.Double click MIME types in the Crash Magic site
3.Click the Add... link
4.Enter .svg for the File name extension box
5.Enter image/svg+xml for the MIME type box
6.Click OK to add the MIME type
7.Click the Add... link
8.Enter .xap for the File name extension box
9.Enter application/x-silverlight-app for the MIME type box
10.Click OK to add the MIME type
11.Click the Add... link
12.Enter .xaml for the File name extension box
13.Enter application/xaml+xml for the MIME type box
14.Click OK to add the MIME type
Increase the file import size for IIS
1.Click on the directory created for Crash Magic(cm) in the Connections section of the IIS manager to return to the IIS Home screen for the application(/cm Home)
2.Click on Request Filtering icon
3.Click Edit Feature Settings link
4.Change the Maximum allowed content length (Bytes) field from 30000000 to 524288000
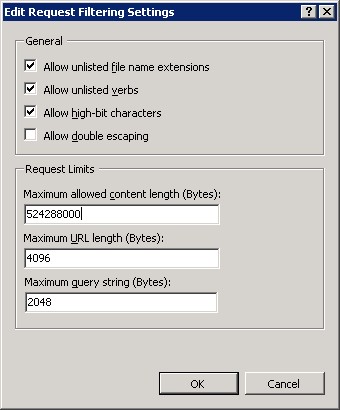
5.Click the OK button to close the window
Stop and restart the application pool for Crash Magic
1.Click on the Application Pools in the Connections section of the IIS manager
2.Select the Crash Magic application pool(cmISAPI32) by clicking on it
3.Click the stop link under the Action section of IIS Manager
4.Click the Start link under the Action section of IIS Manager
Check the web site
1.Click on the directory created for Crash Magic(cm) under connections to return to the IIS Home screen for the application(/cm Home)
2.Click the Browse *:80(http) under the Action section of the IIS Manager to test the web site and see the Crash Magic Online Maintenance Form open
Ensure the Install Administrator login and password are set
1.Pass the URL for the site, the login and password information on to the person designated as the Database Administrator for Crash Magic
2.Pass the URL for the site, the login and password information on to the person designated as the Group Administrator for Crash Magic and instruct them to wait for notification from the database administrator before performing their installation tasks
3.Click the Exit button save the information and close the window
Upload Read Ahead
Ensure that the IIS Management Scripts and Tools role has been installed on the server.
Open a command prompt window as Administrator and execute the AppCmd.exe command with the appropriate parameters will set the packet size to a value that should work well for Crash Magic SOAP needs. The AppCmd.exe can be found in the %systemroot%\system32\inetsrv\ directory. While in the inetsrv directory run the following command replacing <Crash Magic Site Identification> with the identifier for the Crash Magic site (The default site id is "Default Web Site/cm").
Syntax: appcmd.exe set config "<Crash Magic Site Identification>" -section:system.webServer/serverRuntime /uploadReadAheadSize:"204800" /commit:apphost
appcmd.exe set config "Default Web Site/cm" -section:system.webServer/serverRuntime /uploadReadAheadSize:"204800" /commit:apphost
Other settings:
ApplicationPool RegularTimeInterval=0